How to obtain an OAuth access token
Here is a small guide to manually get an access token for your local tests.
IMPORTANT: To get an access token for GoToAssist Corporate see the GoToAssist Corporate API specification.
Obtaining an Authorization Code
- Choose OAuth Clients on the main menu.
- Open your client and copy the client ID value.
- Insert the client ID into the sample URL below to replace {clientID}.
- Enter a valid redirect URI to replace {redirectUri}. This value is optional but recommended to prevent the wrong URI to be used.
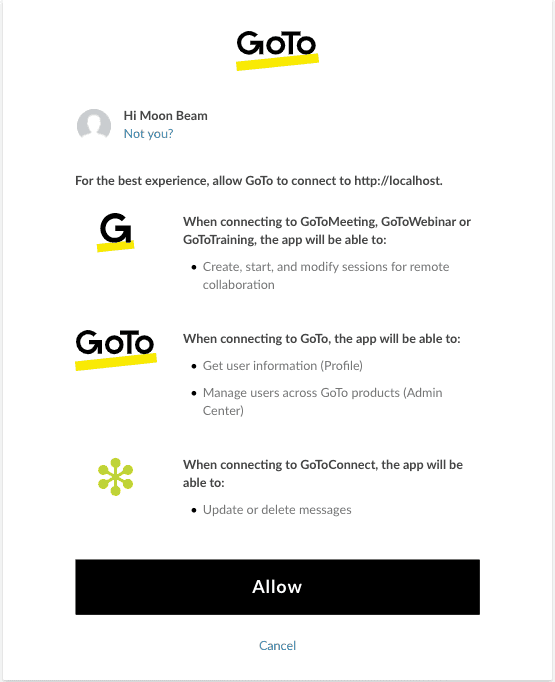
- Send the call from your browser address/search field. You are directed to the GoTo sign in page.
- If you are not already logged in, you will sign in with your credentials and must click Allow to authorize access for your API client.
- You are then automatically redirected to the redirect URI. The redirect URI (in the browser address bar) includes an authorization code.
NOTE: Only the scopes set in your OAuth client will be requested from your end users.
Sample URL
https://authentication.logmeininc.com/oauth/authorize?client_id={clientID}&response_type=code&redirect_uri={redirectUri}
With (fake) values filled in, the call looks like:
https://authentication.logmeininc.com/oauth/authorize?client_id=a2094c4f-fAk0e-4339-934f-4da2d788d0aa&response_type=code&redirect_uri=https://example.com
Allow Screen Sample
IMPORTANT: You may see an error on the page such as 404 NOT FOUND. This is not a problem. Look at the URL in the browser. It contains the authorization code you need for the next step. It will look something like:
https://example.com/?code=iS0vynEEvRFA9i6kZ8gvNDnnOGE...
Retain this code for the next step.
Obtain an Access Token
You can now send the authorization code in exchange for an access token. Each authorization code can only be exchanged once. Any subsequent attempts will result in an error.
Request an access token using a POST call. This call can be sent through Postman, using the cURL command line, or other clients.
cURL syntax below shows the full request. Details on creating the Authorization header and the other POST data follows the code sample.
curl -X POST "https://authentication.logmeininc.com/oauth/token" \
  -H "Authorization: Basic YTIwfAKeNGYtODY4YS00MzM5LTkzNGYtNGRhMmQ3ODhkMGFhOjNuYU8xMElBMmFnY3ZHKzlJOVRHRVE9PQ==" \
  -H "Accept:application/json" \
  -H "Content-Type: application/x-www-form-urlencoded" \
  -d "redirect_uri=https://example.com&grant_type=authorization_code&code=iS0vynEEvRFA9i6kZ8gvNDnnOGE..."
The code value above is truncated for clarity in the example.
Authorization header
The Authorization header needs to be the client ID and secret encoded in base64 format. You can use the following bash snippet for instance to do that:
echo -n "CLIENT_ID:CLIENT_SECRET" | base64where CLIENT_ID and CLIENT_SECRET are replacted with your real values.
The encoded value will look like
YTIwfAKeNGYtODY4YS00MzM5LTkzNGYtNGRhMmQ...Add this value to the Authorization header after the word Basic as shown in the cURL example above.
Data Parameters
| Parameter | Description | Format | Required |
|---|---|---|---|
| grant_type | authorization_code | string | Yes |
| code | authorization code | string | Yes |
| redirect_uri | location where authorization code will be sent | string | Yes |
Response example
IMPORTANT: The access token and refresh token values are truncated. They are large values.
{
  "access_token": "eyJraWQiOiJvYXV0aHYyLmxt666...",
  "token_type": "Bearer",
  "refresh_token": "eyJraWQiOiJvYXV0aHYyLmxt999...",
  "expires_in": 3600,
  "scope": "users.v1.lines.read calls.v2.initiate",
  "principal": "mister.jones@fakemail.com"
}
Response data
The following is sample output.
| Parameter | Description |
|---|---|
| access_token | OAuth access token |
| token_type | The type of the access token (always "Bearer") |
| refresh_token | Refresh token identifier, valid until product logout |
| expires_in | The period, in seconds, until the access token expires |
| scope | The allowed scope(s) for the issued token, separated by a whitespace |
| principal | The email identifier that owns the token |
This access token can now be used to authorize API requests by setting it in the Authorization header with the following format: "Authorization: Bearer {access_token}". E.g. for the GET Me request of the SCIM API, which will provide useful information about the authenticated user:
curl -H "Accept: application/json" \
-H "Authorization: Bearer eyJraWQ..." \
"https://api.getgo.com/identity/v1/Users/me"- How do I get started?
- How to create a developer account
- How to create an OAuth client
- How to obtain an OAuth access token
- How to obtain an OAuth access token using a Personal Access Token
- How to obtain an OAuth access token (in Node.js)
- How to Obtain and Use Refresh Tokens
- Migrating to New Token Retrieval with authentication.logmeininc.com
- How to use GoToConnect API to fetch account users and lines
- How to create, update and delete account users via Admin API
- Call Events Screen Pop Tutorial
- Send SMS tutorial
- How to use Voice Admin APIs
- How to create a channel and receiving notifications from GoTo services
- How to subscribe to and get call events
- Fetching Call Events Reports
- Make and Receive Calls using the Devices and Calls API
- GoTo Connect APIs Host Migration
- GoToWebinar webhooks
- How to use GoToWebinar webhooks
- What API information is available for GoToMyPC?
- How to Setup an Integration with Central
- How to Setup an Integration with Rescue
- Rescue iOS and Andriod SDK
- Introduction
- Java SDK
- .NET SDK
- Direct login migration
- How to use Postman API collections
- How much do the GoTo APIs cost?
- How do I get support for the APIs?
- Rate Limiting

