Call Events Screen Pop Tutorial
Screen pop presents call information, such as links to open support tickets, customer tier from a CRM, or upcoming appointments to your users. Use screen pop when your users would benefit from extra information about the caller.
GoTo Connect offers calling capabilities and APIs to enable features like screen pop. In this tutorial, you will create your OAuth credentials, and setup a demo application which will utilize APIs in GoTo Connect to react to incoming calls.
Summary
You will complete the following steps:
- Create an OAuth Client for this tutorial
- Set up and run your screen pop demo application using Node.js
Prerequisites
For this tutorial, you will need the following:
- An access to an account, please request a trial account by contacting sales here. An SMS limit may apply.
- An access to an 'Admin' user on said account (will be used in the demo).
- Node.js (20.6 or newer).
- A code editor of your choice. A popular choice is VSCode.
OAuth Client Creation
Your OAuth client will be used to create tokens, which provide authorization to your API calls.
To create your first client,
-
Navigate to the OAuth Client Management Portal. You might have to log in again. If you do, use the user account that you created for the trial setup. Note that the user account used to create OAuth clients is the only user account which can manage the clients. This tutorial will use the Authorization Code Grant flow for authorization. Interactions with this flow have been created for you in the template used further down.
-
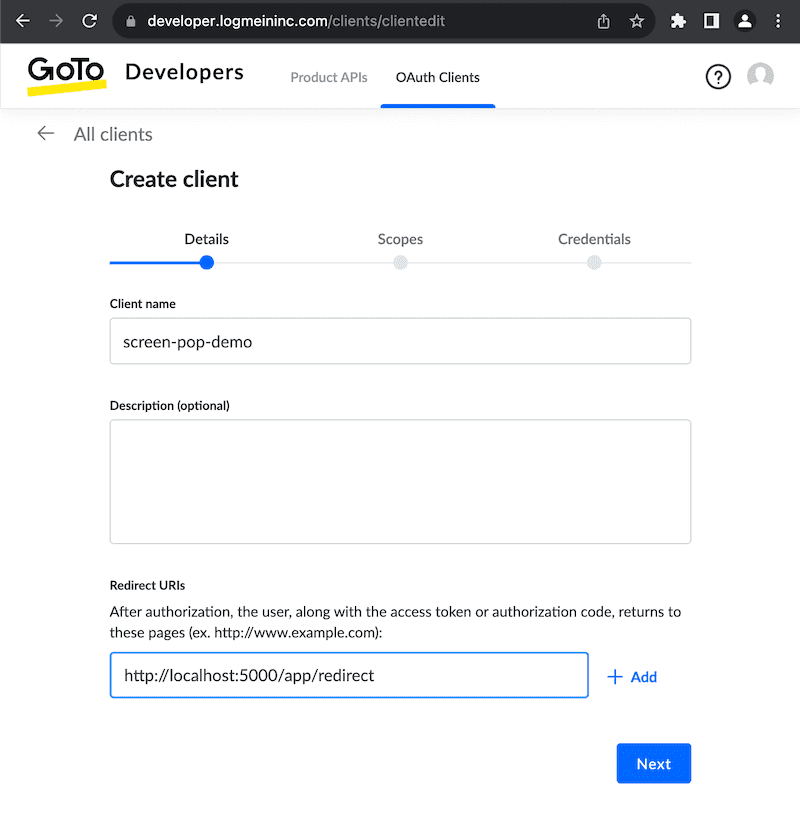
Click 'Create a client' to begin filling out your client information. Name your client something meaningful. For this tutorial we named our client "screen-pop-demo" to match the application we are creating it for. The redirect URI must equal
http://localhost:5000/app/redirectfor this tutorial. -
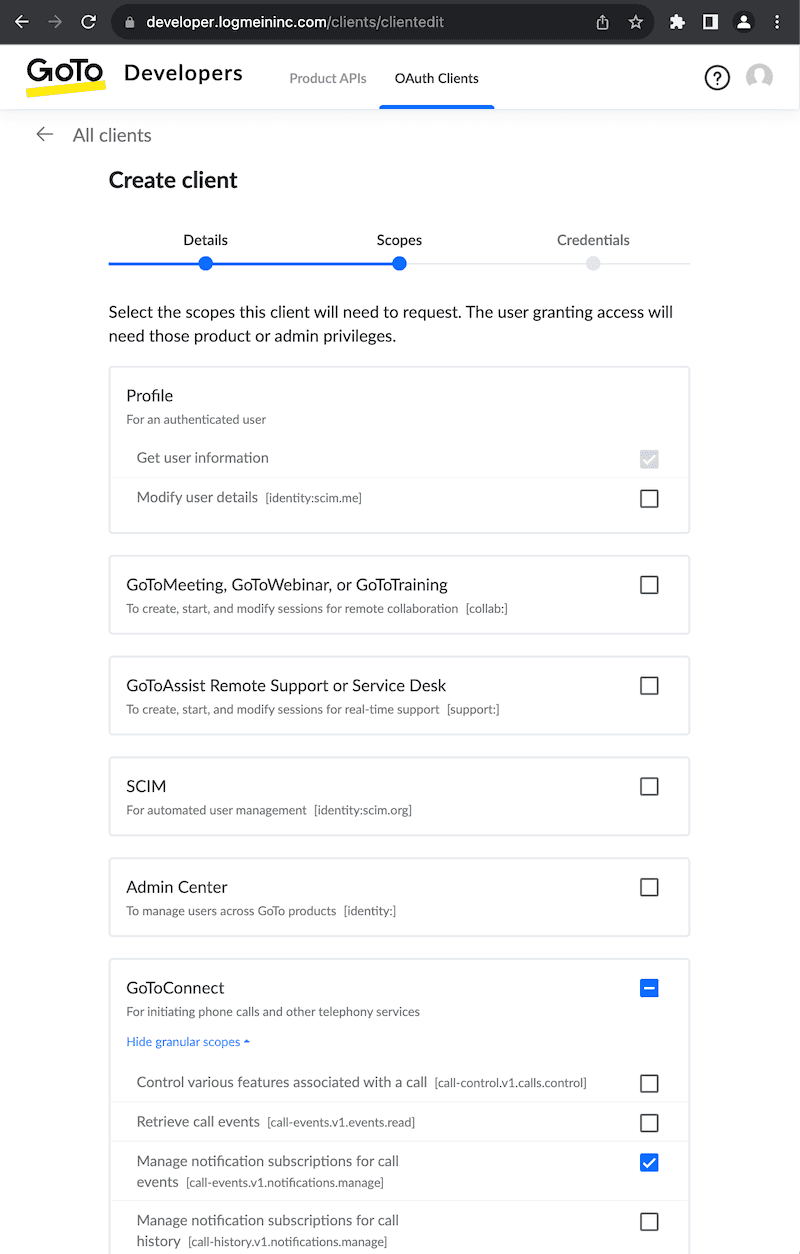
Check the GoToConnect scopes for your client. We will be interacting with the GoToConnect APIs for this tutorial and only require the following scope to be selected:
call-events.v1.notifications.manage. Scopes are requested to be able to subscribe to channels and be notified of Call Events. -
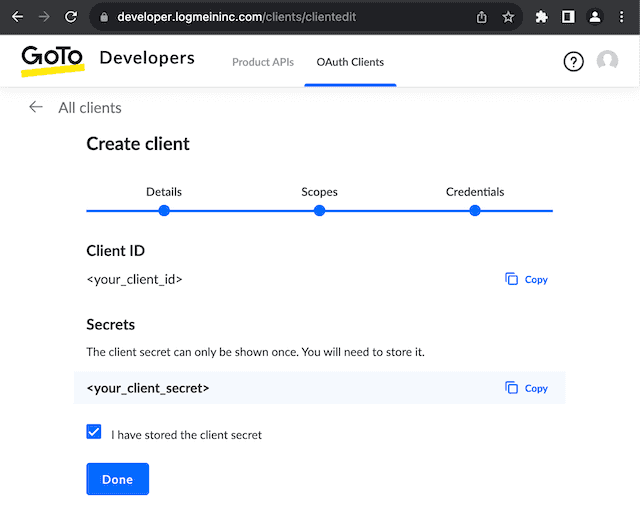
Your client ID and client secret will be displayed. Remember, you can re-view your client id in the OAuth Client Management Portal.
Demo Application Setup
1. Retrieve the Tutorial Template
This tutorial will use a pre-setup template. We have created this template as boiler code for you to use in your screen pop tutorial. The degit tool provides a simple way to clone this template.
$ npm install -g degit$ degit goto-developers/screen-pop-demo#template screen-pop-demo$ cd screen-pop-demo
You will be performing the next steps in files relative to the screen-pop-demo folder.
2. Create your .env Configuration File
Create a .env configuration file in the same directory as the application source code with
the following content, replacing placeholder <your_client_id>/<your_client_secret> with information noted in the 'OAuth Client Creation' step above.
You can retrieve your account key by calling the Admin API.
OAUTH_CLIENT_ID=<your_client_id>
OAUTH_CLIENT_SECRET=<your_client_secret>
ACCOUNT_KEY=<your_account_key>
3. Create a Notification Channel
Set up your application so that it creates a notification channel through which Call Events will flow. For this tutorial, you will use a WebSocket-based notification channel. You can also refer to the notification channel documentation for more information.
In service/notification.ts:
  public async fetchData(token: string) {
    this.demoChannelIdPromise = new CustomPromise<string>(() => undefined);

    // [STEP3] Create a notification channel
    const response = await fetch(
      `https://api.goto.com/notification-channel/v1/channels/${this.channelNickname}`,
      this.channel.request(token),
    );
    if (response.status != StatusCodes.CREATED) {
      this.logger
        .error(`Error while creating notification channel, error status code: \
        [${response.status} (${getReasonPhrase(response.status)})]`);
      throw new Error("Failed to create notification channel");
    }
    this.logger.info("Channel has been created");
    const demoChannel: ChannelResponse =
      (await response.json()) as ChannelResponse;
    this.demoChannelIdPromise.resolve(demoChannel.channelId);
    return demoChannel;
  }
Response Example:
{
    "channelId": "0vTpo-UTMtHMl3lE4EI22OebVueT17KEDiOUV8H6ZEscG1qeZhW30kVeRj5UryQBHMA5mM58BzCvaAtpWl7vYKw",
    "channelNickname": "screen-pop-demo",
    "channelData": {
        "channelType": "WebSockets",
        "channelURL": "wss://webrtc.jive.com/notification-channel/v1/channels/0vTpo-UTMtHMl3lE4EI22OebVueT17KEDiOUV8H6ZEscG1qeZhW30kVeRj5UryQBHMA5mM58BzCvaAtpWl7vYKw/channelId/ws",
        "isConnected": false
    },
    "channelLifetime": 10800
}
The fields that require your attention are channelId and channelURL. The application will provide the channelId to the request for subscribing to Call Events at the next step. Your application will listen to Call Events through the channelURL WebSocket.
4. Create a Subscription
Set up your application so that it subscribes to Call Events (will flow through the WebSocket obtained at the previous step).
In service/subscription.ts:
  public async fetchData(token: string) {
    // [STEP4] Create a Subscription
    const response = await fetch(
      `https://api.goto.com/call-events/v1/subscriptions`,
      this.subscription.request(token),
    );
    if (response.status != StatusCodes.MULTI_STATUS) {
      this.logger
        .error(`Error while subscribing to Call Events, error status code: \
        [${response.status} (${getReasonPhrase(response.status)})]`);
      throw new Error("Failed to request subscription to Call Events");
    }
    const subscriptions: SubscriptionResponse =
      (await response.json()) as SubscriptionResponse;

    subscriptions.accountKeys.forEach((account) => {
      if (account.status !== StatusCodes.OK) {
        this.logger.error(
          `Subscription failed for account key [${account.id}] \
          with status [${account.status}] (error code: [${account.errorCode}])`,
        );

        // stop at the first error
        throw new Error(
          `Failed to request subscription to Call Events for account key: [${account.id}]`,
        );
      }
    });

    this.logger.info("Subscription has been created");
    return subscriptions;
  }
Response Example:
{
  "accountKeys": [
    {
      "id": "2930718022414574861",
      "status": 200,
      "message": "Success"
    }
  ]
}
Demo
All the parts have been set up:
- Run
$ npm installto download Node.js dependencies. This only needs to be done once. - Run your demo application with
$ npm start.
At any point in time, press Ctrl-C in your terminal to exit.
When the application starts, you will get prompted to follow a login link before the demo
can continue. The client_id and state parameter will differ.
[2023-11-14T14:54:27.342Z] [INFO] [SERVER] Server is created at ws://localhost:3000

Open this URL in a browser to start the web application:
-------------------------------------------
https://authentication.logmeininc.com/login?service=https%3A%2F%2Fauthentication.logmeininc.com%2FOAuth%2Fapprove
%3Fclient_id%3D11111111-1111-1111-1111-111111111111
%26response_type%3Dcode
%26redirect_uri%3Dhttp%253A%252F%252Flocalhost%253A5000%252Fapp%252Fredirect
%26scope%3Dcall-events.v1.notifications.manage
%26state%3D1111111111111111111111111111111
-------------------------------------------
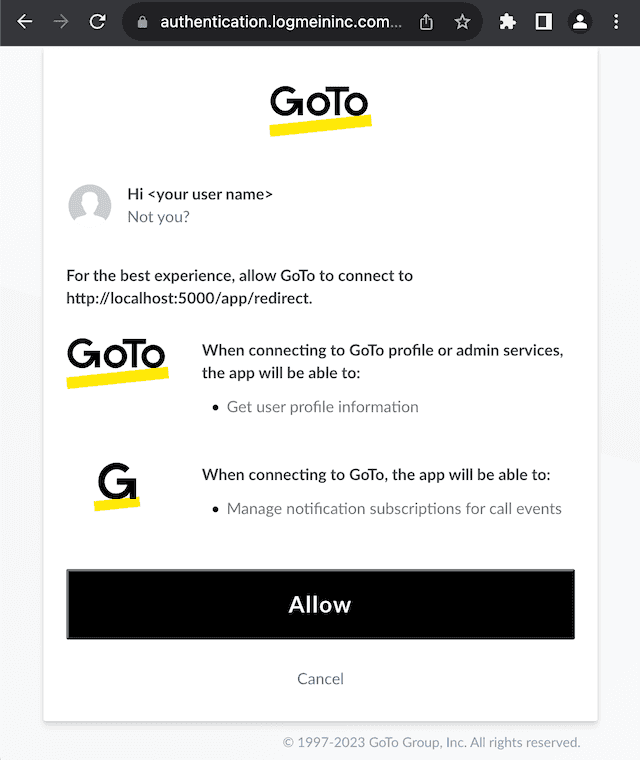
The first time, you will be prompted to accept the scopes the app is requesting before being redirected back to your application.
After authenticating, the application will:
- exchange the authorization code for an OAuth token to use with subsequent API calls.
- create a WebSocket Notification Channel.
- create a Call Events subscription attached to this channel.
- redirect your browser to http://localhost:5000/app/redirect which shall give you the Screen Pop demo screen.
- connect to the WebSocket, listen for Call Events notifications.
Any inbound call to your account will send events to your demo application. To trigger one such event, your user has to be online on GoTo Connect and ready to receive calls. Provisioned hardware phones or using the GoTo Connect Mobile application will also work.
Test your demo application by calling your user at its provisioned number using another phone (you will have to call the account using a phone number that is external to the account). You should see an event pop displaying the caller's information as shown below:
This completes the screen pop tutorial. You have learned how to authenticate via OAuth, subscribe and listen to Call Events, and react to an event when it occurs.
Additional Notes / Troubleshooting
- The
lookupfunction inservice/callEventsWs.tsserves as an example to show how some user information could be looked up in your own metadata. This would normally be a call to an API or some other storage. For this tutorial we have filled out this method and return static data. A real application might use the data to look up the caller in a CRM system, look up local call history and recognize back-to-back calls for urgency, show links to existing support tickets, or even notes from a previous call.
  private lookup(
    participant: Participant,
    timestamp: string,
  ): ScreenPopMessage {
    const inboundCaller = InboundCaller.get(participant.type);

    // "lastCall", "notes":
    // would be looked up in your CRM via an API call or storage lookup.
    // Here they are hard-coded.
    return {
      id: uuidv4(),
      timestamp: timestamp,
      name: inboundCaller.name,
      number: inboundCaller.number,
      lastCall: "1 hour ago",
      notes: "VIP, loyal customer",
    } as ScreenPopMessage;
}-
An error while your application is starting (during the authorization step or the Call Events subscription for instance) will prevent the server from starting. Logs in your terminal should provide an indication as to what caused the error.
-
The following can be added to your
.envfile to enable debug-level logs from your application:
SHOW_DEBUG_LOGS=trueCompleted Demo Application Link
A completed version of the demo for this tutorial can be found at goto-developers/screen-pop-demo (main branch).
- How do I get started?
- How to create a developer account
- How to create an OAuth client
- How to obtain an OAuth access token
- How to obtain an OAuth access token using a Personal Access Token
- How to obtain an OAuth access token (in Node.js)
- How to Obtain and Use Refresh Tokens
- Migrating to New Token Retrieval with authentication.logmeininc.com
- How to use GoToConnect API to fetch account users and lines
- How to create, update and delete account users via Admin API
- Call Events Screen Pop Tutorial
- Send SMS tutorial
- How to use Voice Admin APIs
- How to create a channel and receiving notifications from GoTo services
- How to subscribe to and get call events
- Fetching Call Events Reports
- Make and Receive Calls using the Devices and Calls API
- GoTo Connect APIs Host Migration
- GoToWebinar webhooks
- How to use GoToWebinar webhooks
- What API information is available for GoToMyPC?
- How to Setup an Integration with Central
- How to Setup an Integration with Rescue
- Rescue iOS and Andriod SDK
- Introduction
- Java SDK
- .NET SDK
- Direct login migration
- How to use Postman API collections
- How much do the GoTo APIs cost?
- How do I get support for the APIs?
- Rate Limiting


